Add a figure or a gallery
Upload an image, give it a caption and an anchor as a figure, link to it from the text, and show several images side by side as a gallery.
A figure is an image with a caption, something the text points at and a reader can study on its own. A gallery is several images shown as one group. This guide adds an image to a work, makes it a figure, links to it, and then builds a gallery with one caption for the whole group.
Upload the image
Images that belong to your work are best uploaded, so they are stored with it and do not disappear when another site moves them.
- In the editor, choose Visual and put the cursor on an empty line where the image should go.
- Choose Media, then Upload, and drop the file or click to choose it. PNG, JPG, GIF, WEBP and SVG are accepted.
- In Alt text, describe what the image shows, for a reader who cannot see it: "Graph of y = sin x over one period", not "a graph".
- Choose Upload & insert. The image appears at the cursor.
In Code, the image is now a line of the form . An
image already on the web can be written in that form directly, with an
https address.
Make it a figure
- In Code, put a line
::::figuredirectly above the image line. - Under the image, after a blank line, write the caption.
- Close the figure with a line
::::.
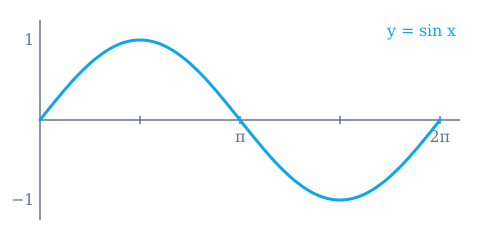
The sine over one period. It is zero at , and , and reaches halfway between.
::::figure

The sine over one period. It is zero at $0$, $\pi$ and $2\pi$, and reaches
$\pm 1$ halfway between.
::::The first block inside the figure is its content and everything after it is the caption, which may run to several sentences with formatting, links and maths. The figure uses four colons, not three, because its content can be a block of its own, such as a diagram or a gallery, and the outer fence needs more colons than anything inside it.
A good caption lets a reader who looks at the figure first understand it without the surrounding text: what is shown, what the axes or colours mean, and the one thing to notice. The alt text says what is in the picture; the caption says what it means. Do not repeat one in the other.
Link to the figure
- Add an anchor to the figure's fence:
::::figure{#fig-sine-period}. - In the text, link to it:
[the figure below](#fig-sine-period).
As the figure below shows, the sine repeats after .
One period of the sine.
As [the figure below](#fig-sine-period) shows, the sine repeats after $2\pi$.
::::figure{#fig-sine-period}

One period of the sine.
::::A click on the link scrolls to the figure. Pick a short name that says what
the figure is, such as #fig-phase-portrait: others can link to it from
outside the work, and the name does not change when you add a figure above
it. The page does not number figures for you, so if your text says
"Figure 2", write the number in the caption and in the link text yourself.
Show several images as a gallery
- Write
:::galleryon a line. - Put one image per line under it, each with its own alt text.
- Close it with
:::.
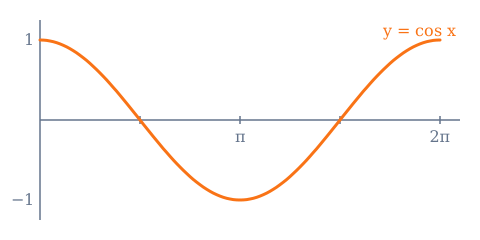
:::gallery


:::A gallery takes images only; a line of text inside it is dropped. Use one for a comparison or a series: a function and its derivative, the same sample under two stains, the frames of an animation.
Caption a gallery as one figure
- Write the gallery as above.
- Put it inside a figure, giving the figure five colons, since the gallery inside it has three.
- Write the caption after the gallery.
The sine and the cosine over one period. Each is the other shifted by : .
:::::figure{#fig-sine-cosine}
:::gallery


:::
The sine and the cosine over one period. Each is the other shifted by
$\pi/2$: $\cos x = \sin(x + \pi/2)$.
:::::This is the only way to put several images in one figure: a figure always has one content block, and a gallery is how that block holds more than one image.
Put a diagram in a figure
A diagram drawn in TikZ goes into a figure the same way an image does: the
:::tikz block is the figure's content and the caption follows it. See
Draw a diagram with TikZ.
The result
In the preview, each figure shows its image with the caption under it, and a link to a figure jumps to it. A gallery shows its images side by side across the width of the text. Clicking an image, or focusing it and pressing Enter, opens it full screen with zoom, and the arrows step through every image on the page in order. That happens only when the viewer would show the image larger than the page does: a small image already shown at full size stays as it is, while gallery images and diagrams always open.
If an image does not open, it is probably inside a link, which a click follows instead, or it failed to load and shows its alt text in a quiet box. See Troubleshooting Markdown.
When a plain image is enough
Not every image needs to be a figure. A small illustration that belongs to the paragraph can be a plain image line. Use a figure when the image has something to say on its own: a result, a diagram the argument relies on, anything you will refer to from elsewhere in the text.